


Ultimate Halloween Porch and Yard Decor Ideas for a Spooktacular Outdoor Display
Bold Creations by TJ 9/28/2026
A great outdoor scene does more than sit on the lawn. It pulls people in from the sidewalk, makes trick-or-treaters pause, and gives the whole block something to talk about.
The best porch and yard displays usually have three things in common: a clear theme, layered lighting, and a few handmade details that feel personal. You do not need a huge budget or a garage full of props. With smart placement, simple DIY crafts, and a little theatrical timing, even a small porch can feel like a haunted attraction.
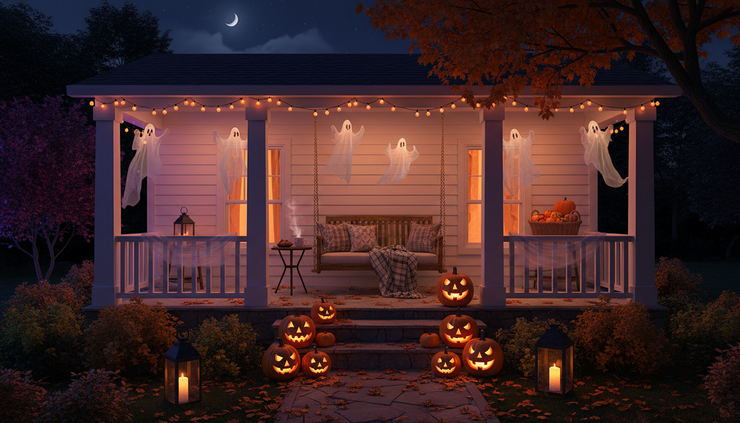
Build a haunted porch that feels like a spooky welcome scene
A haunted porch is the easiest place to start because guests see it up close. Make it feel like an old manor entrance with tattered fabric, flickering lights, and a few creepy figures watching from the corners.
The goal is to create layers. Put larger items in the back, medium props at eye level, and small details near the steps where visitors can spot them as they walk up.
What you need
Black or gray cheesecloth
Battery-operated candles
Faux cobwebs
Plastic chains
A wreath form
Black ribbon, faux ravens, or small skulls
Command hooks or outdoor clips
One motion-activated prop, if you have one
Step-by-step haunted porch setup
Start with the doorway. Drape cheesecloth around the door frame and porch railings. Pull a few holes into the fabric so it looks aged, not neat.
Add a creepy wreath. Wrap a plain wreath form in black ribbon, then attach faux ravens, spiders, bones, or tiny skulls. Hang it slightly off-center for an abandoned look.
Set candles at different heights. Place battery-operated candles on steps, side tables, plant stands, or upside-down crates. Use warm white candles for a gothic glow.
Stretch cobwebs with patience. A little webbing goes a long way. Pull it thin until it looks wispy. Thick clumps look less realistic and collect leaves fast.
Place one surprise prop. A motion-sensor ghost, talking skeleton, or swinging bat works best near the door, where someone naturally steps close enough to trigger it.
Frame the scene with sound. A small speaker hidden behind a planter can play low wind, creaking doors, or distant thunder. Keep the volume low enough that it adds mood without bothering neighbors.
For a bold porch moment, hang lightweight “floating candles” from the ceiling. Use empty paper towel tubes painted white, hot glue drips around the top edge, and battery tea lights inside. Suspend them with fishing line so they hover above the entry.
The trick is to make the porch look good both from the street and from three feet away.
Turn the front yard into a creepy graveyard
A graveyard theme is a classic for a reason. It fills space well, works in yards big or small, and gives you plenty of room for funny, spooky, or dramatic details.
The most common mistake is lining tombstones in a perfect row. Real graveyards have variation. Angle a few markers, stagger the rows, and tuck some stones behind shrubs so the yard feels deeper.

What you need
Foam board or premade tombstones
Gray, black, and white outdoor craft paint
Wooden stakes or lawn stakes
Skeleton hands or bones
Solar path lights or low-voltage spotlights
Mulch, leaves, or straw
Optional fog machine rated for outdoor use
Step-by-step graveyard setup
Sketch the yard from the sidewalk view. Mark where the biggest tombstones should go first. Place them toward the back or near shrubs.
Make DIY tombstones. Cut foam board into uneven headstone shapes. Paint them gray, then dry-brush black and white over the edges to create a weathered stone effect.
Write funny or eerie names. Keep them family-friendly if trick-or-treaters will visit. Short inscriptions are easier to read at night.
Stake every tombstone. Attach each foam stone to a wooden stake with outdoor tape or glue. Push stakes deep enough that wind will not flip them.
Add signs of movement. Place skeleton hands in front of stones so it looks like something is crawling out. Scatter bones near the base of shrubs.
Use light from below. Aim small spotlights upward at tombstones. This creates long shadows and makes even simple props look dramatic.
Create ground texture. Spread leaves, straw, or dark mulch around the stones. This hides stakes and makes the display look less staged.
If you use fog, keep it low and away from walkways. Ground fog looks incredible drifting between stones, but clear footing matters more than atmosphere. Use outdoor-rated extension cords and keep plugs off wet grass.
For a twist, add a “fresh grave” mound with a small pile of soil-colored mulch, a tilted shovel, and one skeletal hand reaching out. It creates a story without needing a large prop.
Set up a witch’s corner with potion bottles and a bubbling cauldron
A witch theme works beautifully on porches, patios, and corners of the yard. It gives you color, humor, and movement, especially if you add a glowing cauldron.
This is also one of the best themes for DIY crafts. Old jars, thrifted bottles, twigs, and labels can turn a simple table into a spell station.
What you need
Plastic cauldron
Green, purple, or orange string lights
Clear jars and bottles
Printable or handwritten potion labels
Food coloring or tinted water
Faux moss, branches, and leaves
A broom
A black tablecloth or scrap fabric
Optional small fan for movement
Step-by-step witch setup
Choose a corner with some cover. A porch corner, tree base, or railing area works well. The setup should feel tucked away, like someone left in a hurry.
Build the cauldron glow. Place battery string lights inside a plastic cauldron. Add a layer of sheer green fabric or clear plastic wrap over the top to diffuse the light.
Make potion bottles. Fill jars with tinted water, glitter, plastic eyeballs, or rubber spiders. Seal them tightly if they might tip.
Label each bottle. Use names like “Moon Dust,” “Bat Wings,” “Dragon Tears,” or “Swamp Mist.” Smudge the paper edges with brown ink or watered-down paint.
Add height. Place bottles on boxes hidden under fabric. Keep a few small bottles near the front and taller ones in the back.
Create a broom station. Lean one or two brooms against a wall or tree. Add a small sign that says “Broom Parking” for a playful touch.
Add motion. A tiny fan under the table can make fabric strips flutter. Keep cords secured and away from walking paths.
For extra drama, hang witch hats from a porch ceiling or tree branch with fishing line. Add battery tea lights inside each hat so they glow overhead. Use lightweight hats only, then tie them securely so they do not blow into the yard.

Create a pumpkin path with lanterns, shadows, and a scarecrow greeter
A pumpkin path brings everything together. It guides visitors safely while making the walk to the door feel exciting. This idea works especially well if your yard already has a walkway, driveway edge, or porch steps.
Mix carved pumpkins with uncarved ones so the display lasts longer. Faux pumpkins are great for hard-to-reach spots, while real pumpkins add texture near the entry.
What you need
Pumpkins in several sizes
Battery-operated tea lights
Solar stake lights
Cardboard or black poster board
Hay bale or sturdy chair
Old flannel shirt and pants
Gloves, hat, and newspaper or packing paper
Zip ties or twine
Step-by-step pumpkin path setup
Line the walkway loosely. Avoid placing pumpkins where people might trip. Keep them along the edges, not in the walking path.
Vary the pumpkin sizes. Group pumpkins in sets of three. Use one large, one medium, and one small pumpkin for a natural look.
Use safe lights. Put battery tea lights inside carved pumpkins. Skip real candles outdoors, especially near fabric, leaves, or costumes.
Cut shadow shapes. Use black poster board to make bat, cat, ghost, or crooked tree silhouettes. Tape them inside windows, then place a lamp behind them.
Build a scarecrow greeter. Stuff old clothes with newspaper or packing paper. Sit the scarecrow on a hay bale, bench, or chair near the porch.
Secure the scarecrow. Tie the body to the chair or bale with twine. Wind can topple lightweight props faster than expected.
Add a final focal point. Put the biggest pumpkin, lantern, or character near the door so the path has a clear finish.
A pumpkin path is also a smart choice if you want a festive display that feels friendly for younger kids. Use silly jack-o’-lantern faces, smiling ghosts, and warm lights instead of intense scares.
For more planning inspiration, treat this post like a mini Halloween Decorating Guide and pick one main theme before buying anything new. A clear plan helps every prop look intentional.
Use outdoor lighting like a scene designer
Lighting decides whether your display feels flat or fantastic. During the day, props carry the scene. At night, light does the heavy lifting.
Think in layers:
Path lighting
Use solar stakes, lanterns, or low lights to guide visitors safely.
Accent lighting
Aim spotlights at tombstones, skeletons, pumpkins, or porch columns.
Color lighting
Use orange for warmth, purple for magic, green for witchy scenes, and blue for ghostly areas.
Backlighting
Place a light behind a prop to create a silhouette. This works well for skeletons, witches, and window shadows.
Try not to blast the whole yard with one bright floodlight. Strong overhead light can flatten the mood. Smaller lights placed low to the ground create better shadows.
If your display includes many small items, light only the strongest pieces. Darkness gives the eye a place to rest and makes the glowing areas feel more special.
Keep the display safe, sturdy, and neighbor-friendly
A spooktacular setup should still be easy to walk through, easy to see, and safe in changing weather. Before the big night, do a full walkthrough after dark and look for anything that could trip, snag, or fall.

Outdoor display safety checklist
Use only lights and extension cords rated for outdoor use.
Keep cords away from walkways, stairs, and wet areas.
Tape or cover cords that must cross a surface.
Choose battery candles instead of open flames.
Keep fabric, straw, leaves, and paper away from heat sources.
Secure tall props with stakes, sandbags, or zip ties.
Leave porch steps and railings clear.
Check that motion props do not jump into walking space.
Keep fog light enough that visitors can see the ground.
Bring delicate props inside during heavy rain or high wind.
If kids will visit, keep the scariest props away from the candy bowl. A spooky yard can still feel welcoming when the main path is bright, open, and easy to follow.
Make the whole yard feel connected
The strongest displays do not need every decoration in the store. They repeat a few choices well.
Pick one main theme, then repeat its colors, textures, and shapes. A haunted porch might use black fabric, warm candles, and ravens. A graveyard might use gray stones, blue light, and skeletal hands. A witch scene might use green glow, potion bottles, and crooked branches.
Before you finish, stand across the street and take a photo. The camera will show gaps, dark spots, and clutter you may not notice up close. Move props around until the scene has a clear beginning, middle, and focal point.
A memorable outdoor display is part craft project, part stage set, and part neighborhood fun. Start with one standout idea, light it well, secure it safely, and let the details do the haunting.

Comments